Block Blast Tips & Strategy
The ultimate high score guide — learn the techniques top players use to break 1 million
Stuck trying to beat your Block Blast high score, only for one bad placement to end the run? You stare at the board, force a piece to fit, and suddenly the combo breaks and it's over. Most players are actually on autopilot — chasing empty space, panic-placing blocks, and ignoring combo flow, which quietly kills their score.
Real improvement doesn't come from repeating generic advice. It comes from understanding how scoring works, how to control streaks, and how to handle tricky pieces before they appear. This guide breaks down the exact techniques high-score players use to keep runs alive and push deeper.
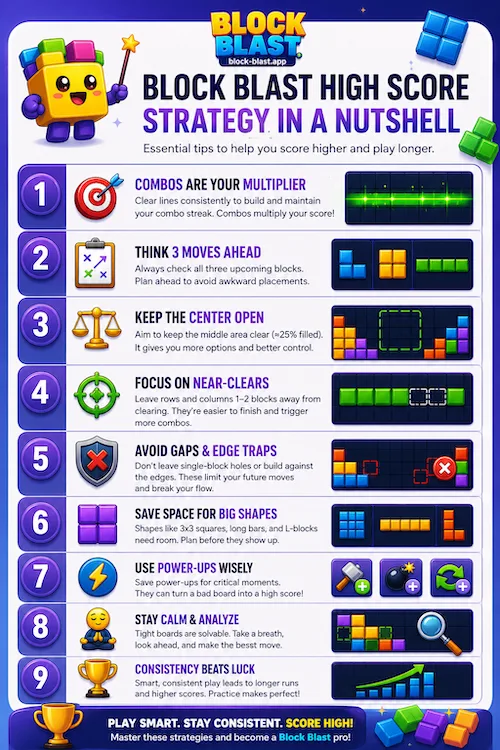
How Does the Block Blast Scoring System Work?
Before diving into advanced techniques, you need to understand how scoring actually works. Most players focus only on placing blocks, but your score really comes from combo streaks, line clears, and how you manage each 3-block round.
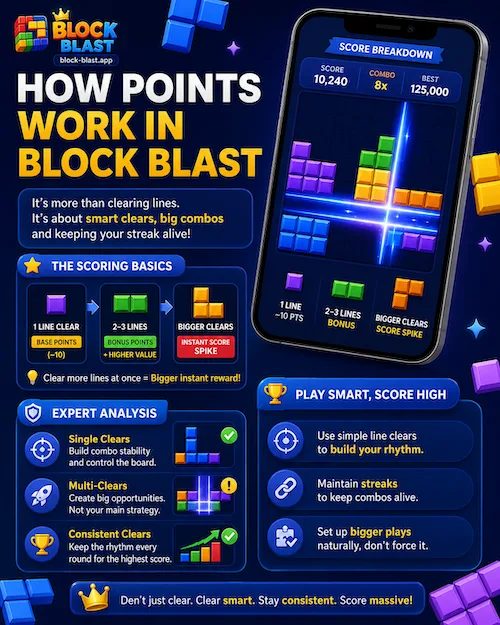
1. Base Line Clear Points
Clearing a full row or column gives you base points. Clear multiple lines in one move and the game adds a bonus multiplier, so your score jumps far higher than stacking single clears.
- 1 line clear → base points.
- 2–3 lines → bonus points and a higher-value move.
- Bigger clears → an instant score spike.
Expert Analysis
Base clears aren't about chasing big points — they're about keeping your combo alive and your board playable. Flashy multi-line clears look smart but often create awkward gaps that break your flow. Consistent single clears every round build rhythm, protect streaks, and set up bigger plays naturally.
Check also: Block Blast Solver
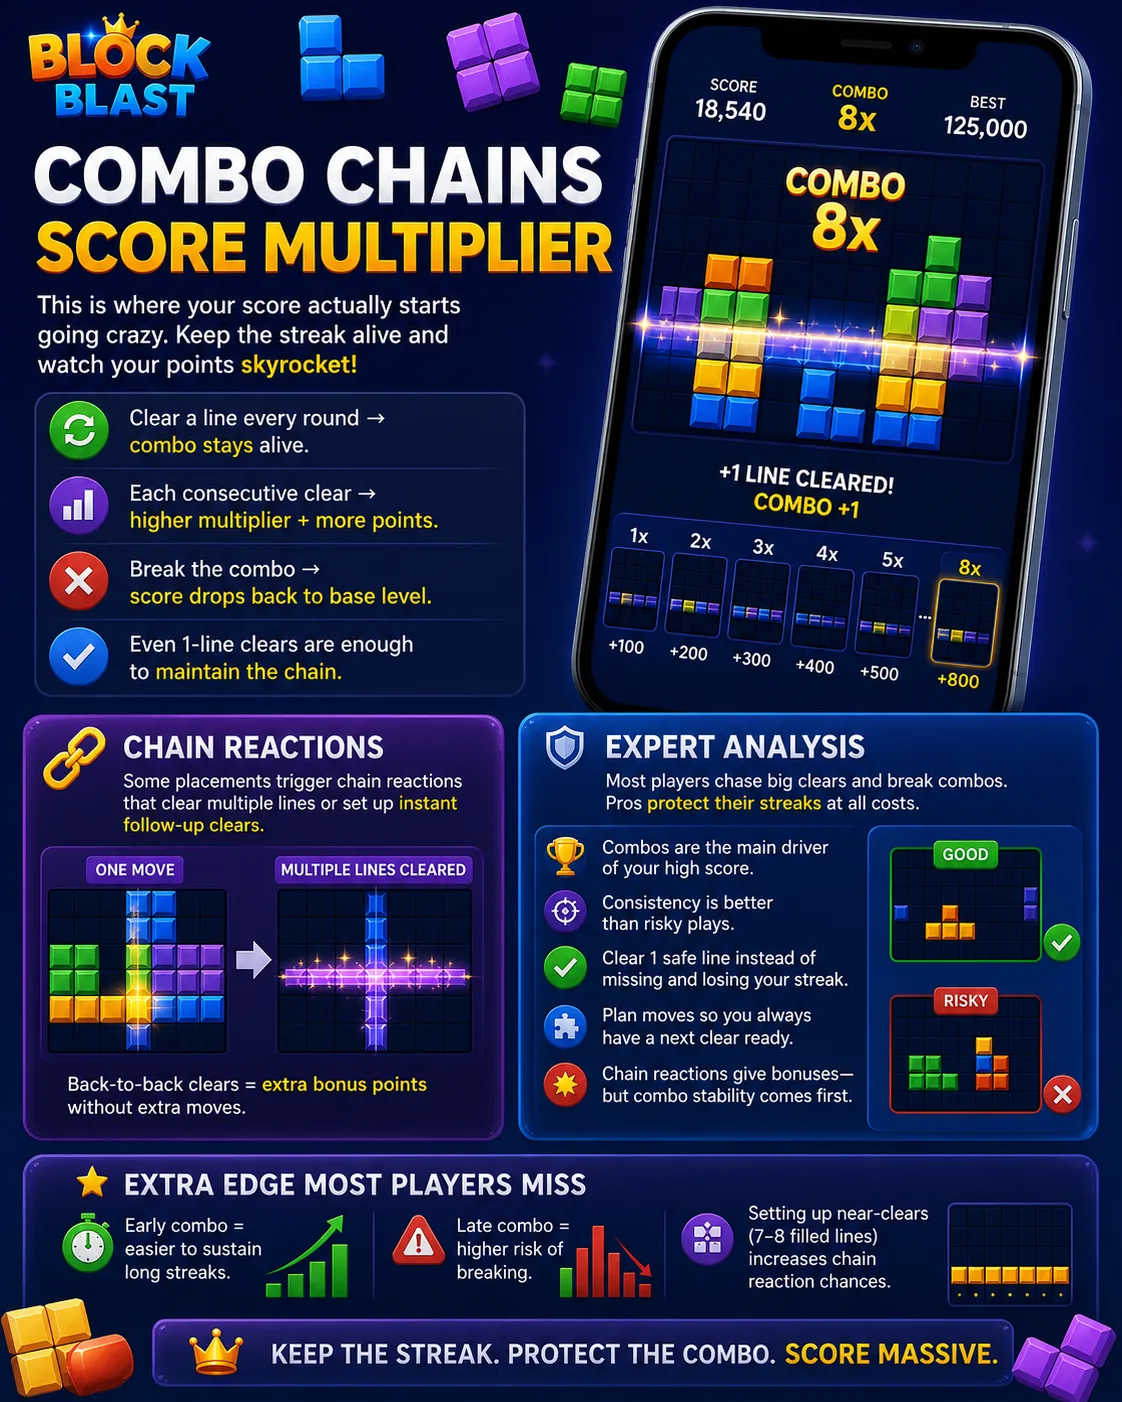
2. Combo Chain Reactions
This is where your score starts climbing fast. A combo chain happens when you keep clearing at least one line every round without breaking the streak, so each clear increases your multiplier.
- Clear a line every round → the combo stays alive.
- Each consecutive clear → a higher multiplier and more points.
- Break the combo → your score drops back to base level.
- Even 1-line clears are enough to keep the chain going.
Expert Analysis
Combos are the main driver of a high score, and consistency beats risky big plays. It's better to clear one safe line than to miss and lose the streak. Plan moves so you always have the next clear ready — and setting up near-clears (7–8 cells filled) increases your chances of a chain reaction.
Read also: How to Play Block Blast
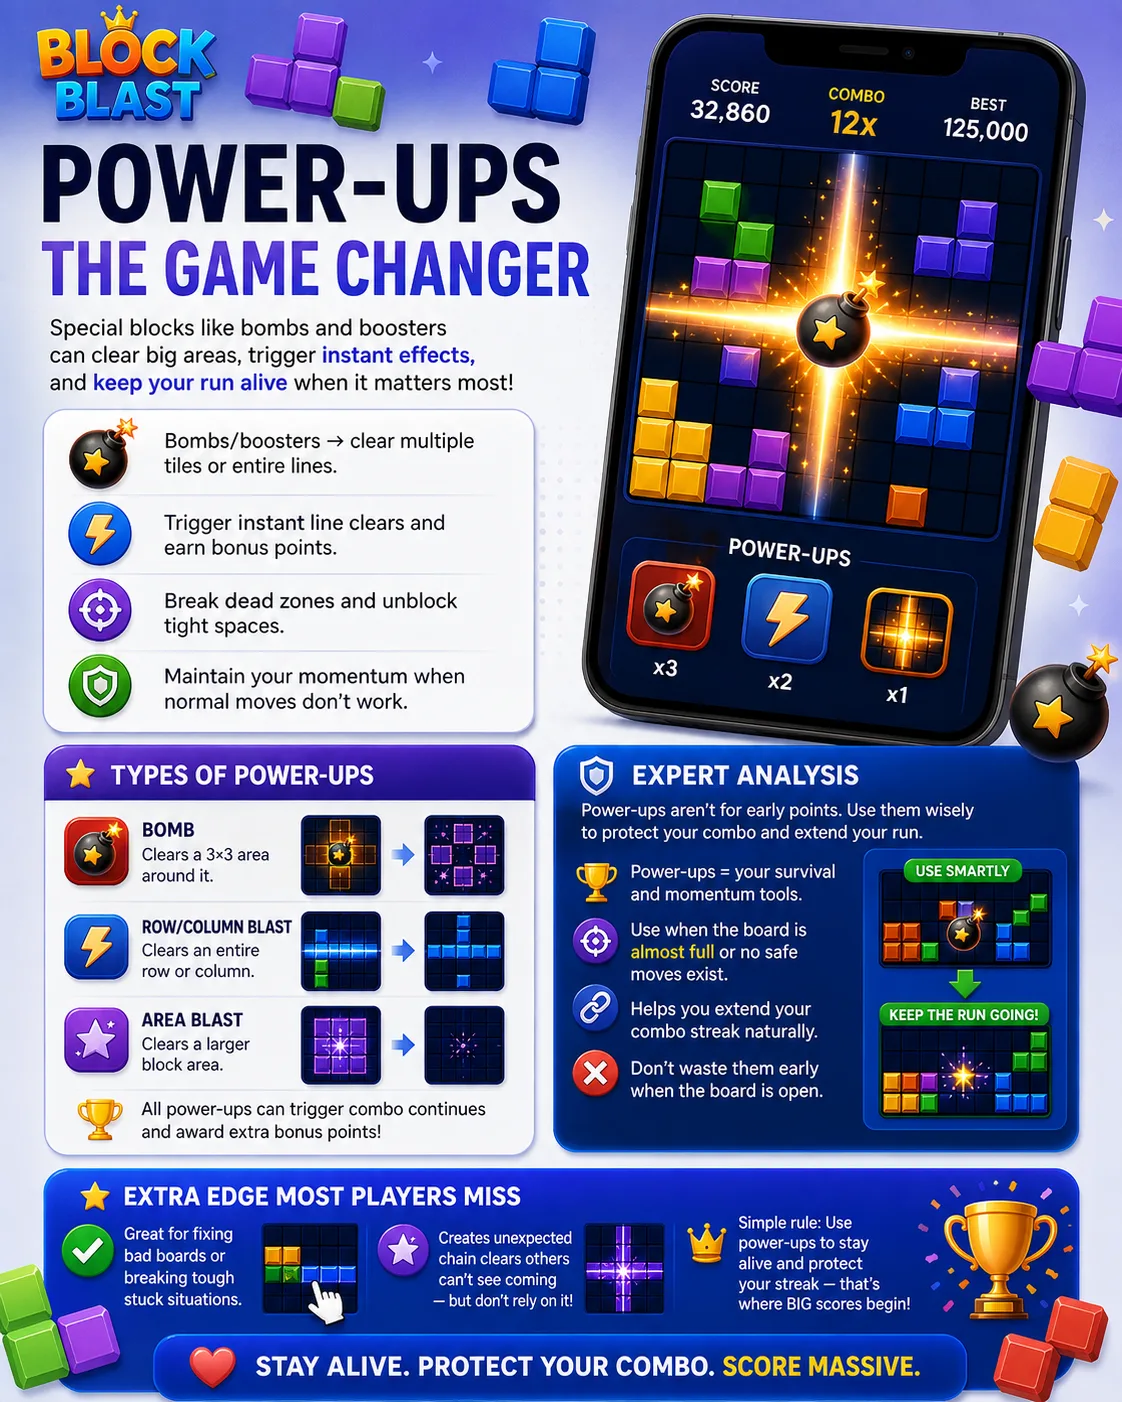
3. Power Ups & Special Blocks
Special blocks like bombs or boosters clear larger areas, full rows, or columns, opening space instantly and keeping your run going.
- Bombs/boosters → clear multiple tiles or entire lines.
- Can trigger instant line clears plus bonus points.
- Help break dead zones or blocked areas.
Expert Analysis
Power-ups are survival tools, not scoring tools. Use them when the board is nearly full or no safe move exists, to protect your combo and extend the run. Don't waste them early while the board is still open — they're best used to fix a bad state or force a clear when you're stuck.
Check also: Block Blast Unblocked
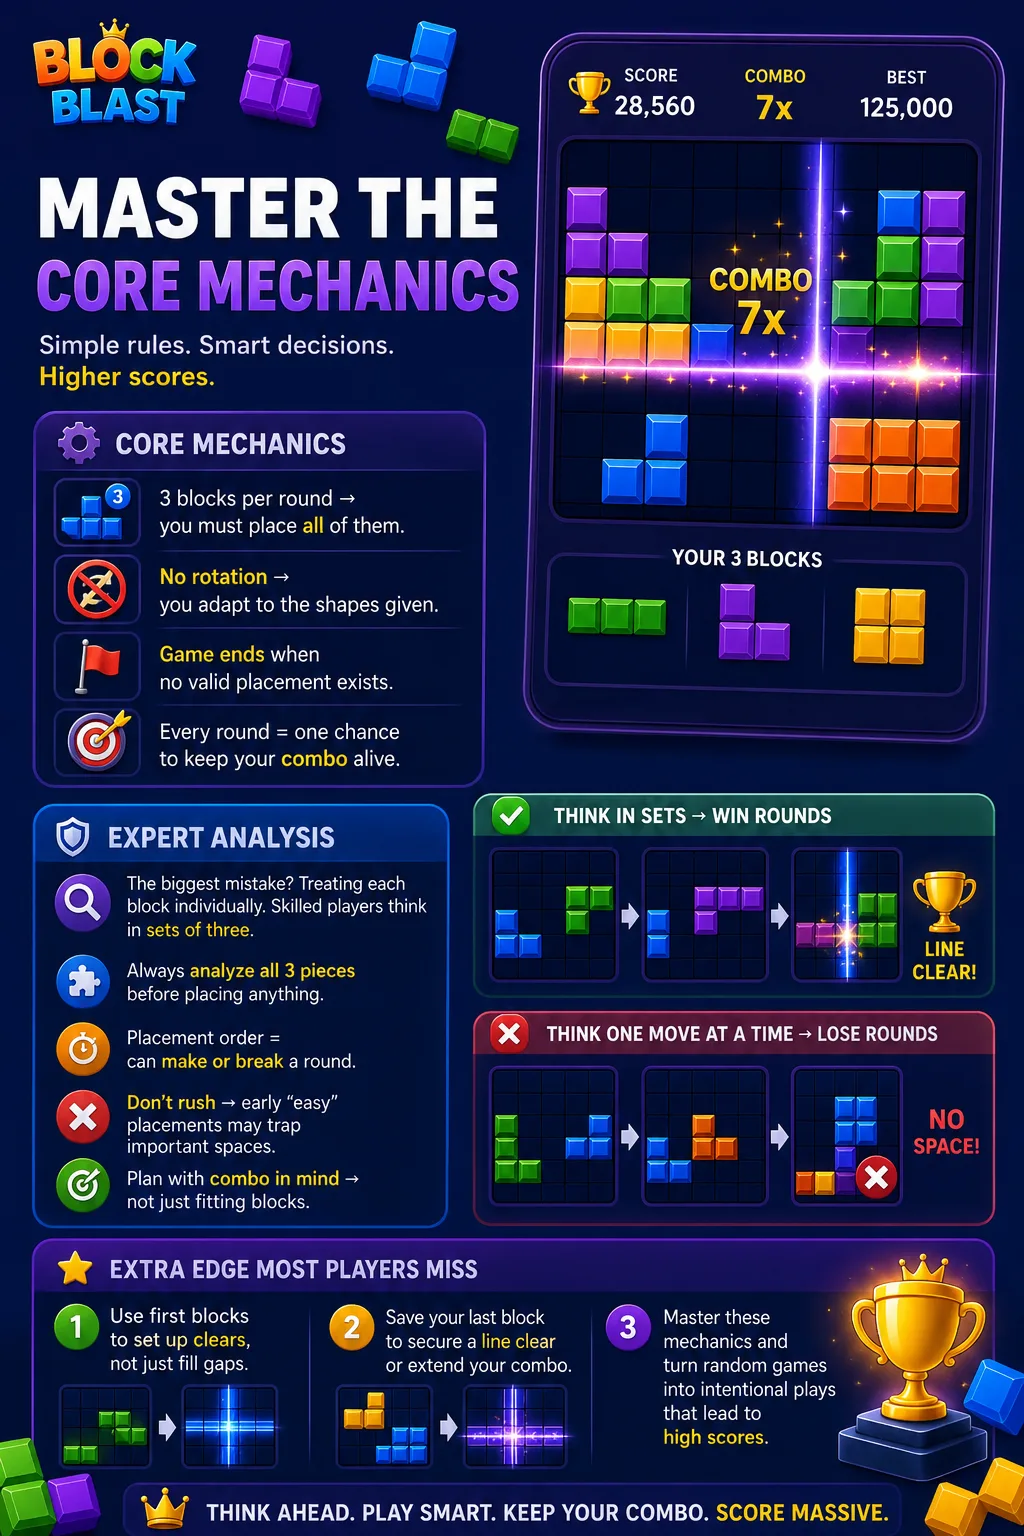
4. Core Mechanics
Block Blast gives you 3 blocks per round, and you must place all three before new ones appear. The game ends only when none of the given blocks can fit anywhere.
- 3 blocks per round → you must place all of them.
- No rotation → you adapt to the shapes given.
- The game ends when no valid placement exists.
Expert Analysis
The biggest mistake is treating each block individually. High-level play is about thinking in sets of three, because the order you place blocks can completely change the outcome even with identical shapes. Analyze all three pieces first, and use the last block to secure a line clear or a combo continuation.
Check also: Score Generator
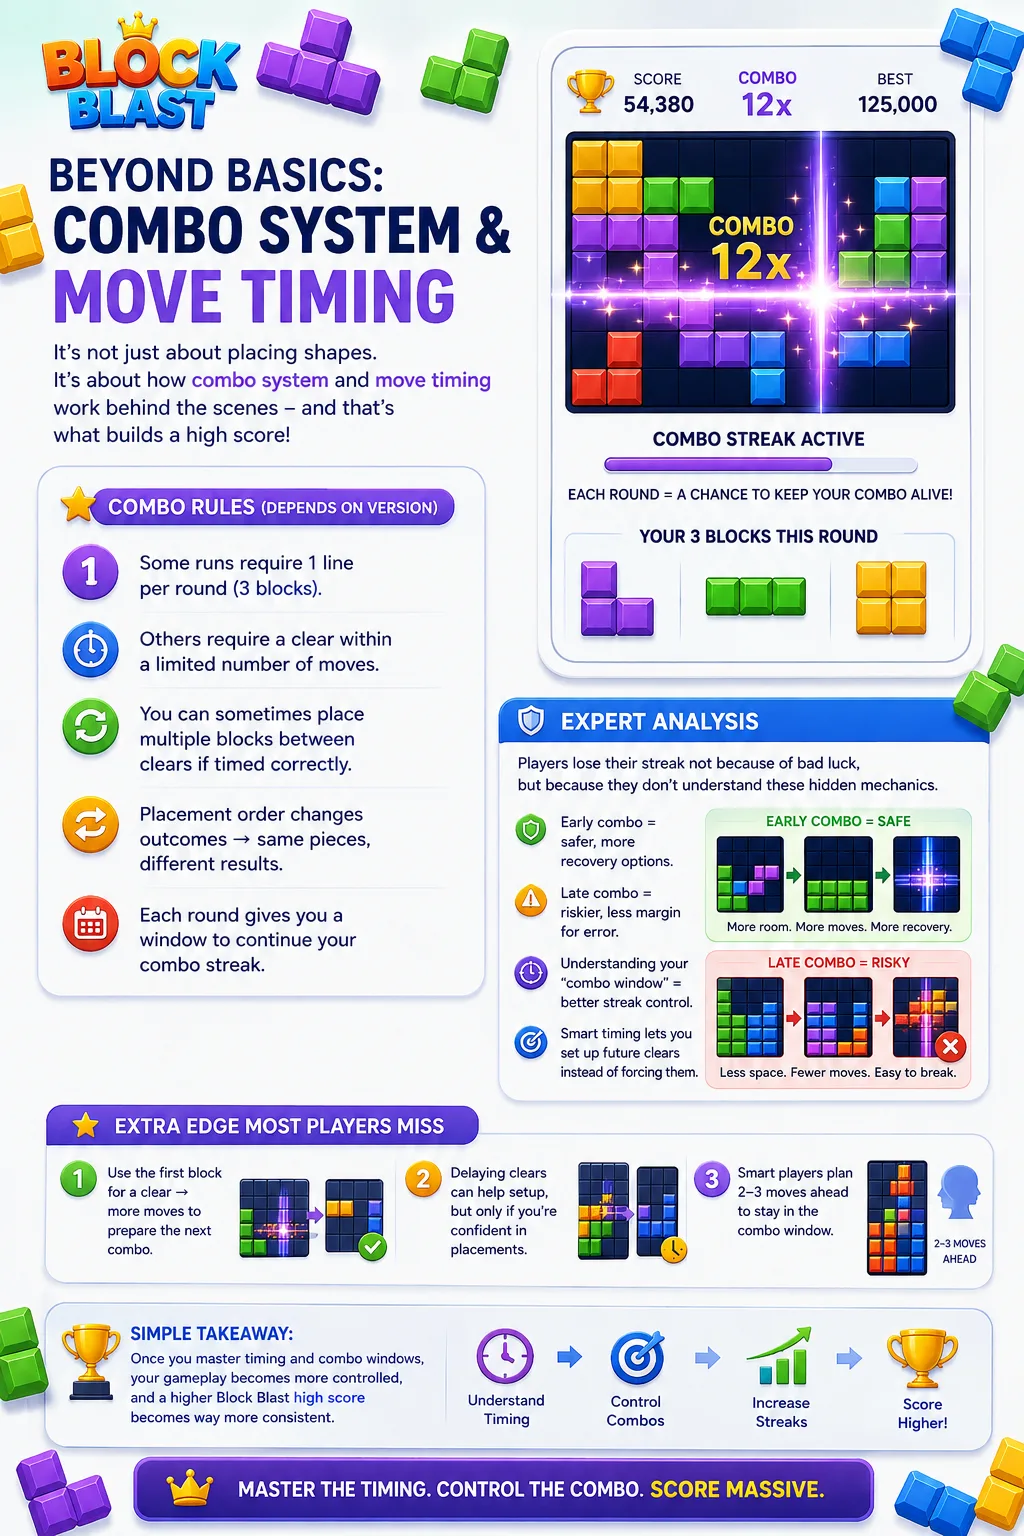
5. Advanced Gameplay Mechanics
Once you understand the basics, timing matters. Combo rules can vary slightly by version, and each round gives you a window to continue your streak.
- Some runs require one line clear per round of three blocks.
- Others require a clear within a limited number of moves.
- Placement order changes outcomes — same pieces, different results.
Expert Analysis
Most players lose their streak because they misunderstand the combo window — they rush a combo too early or delay too long. Using your first block for a clear gives you more moves to prepare the next combo. Understanding your window is what separates controlled play from random placement.
Check also: Daily Challenge
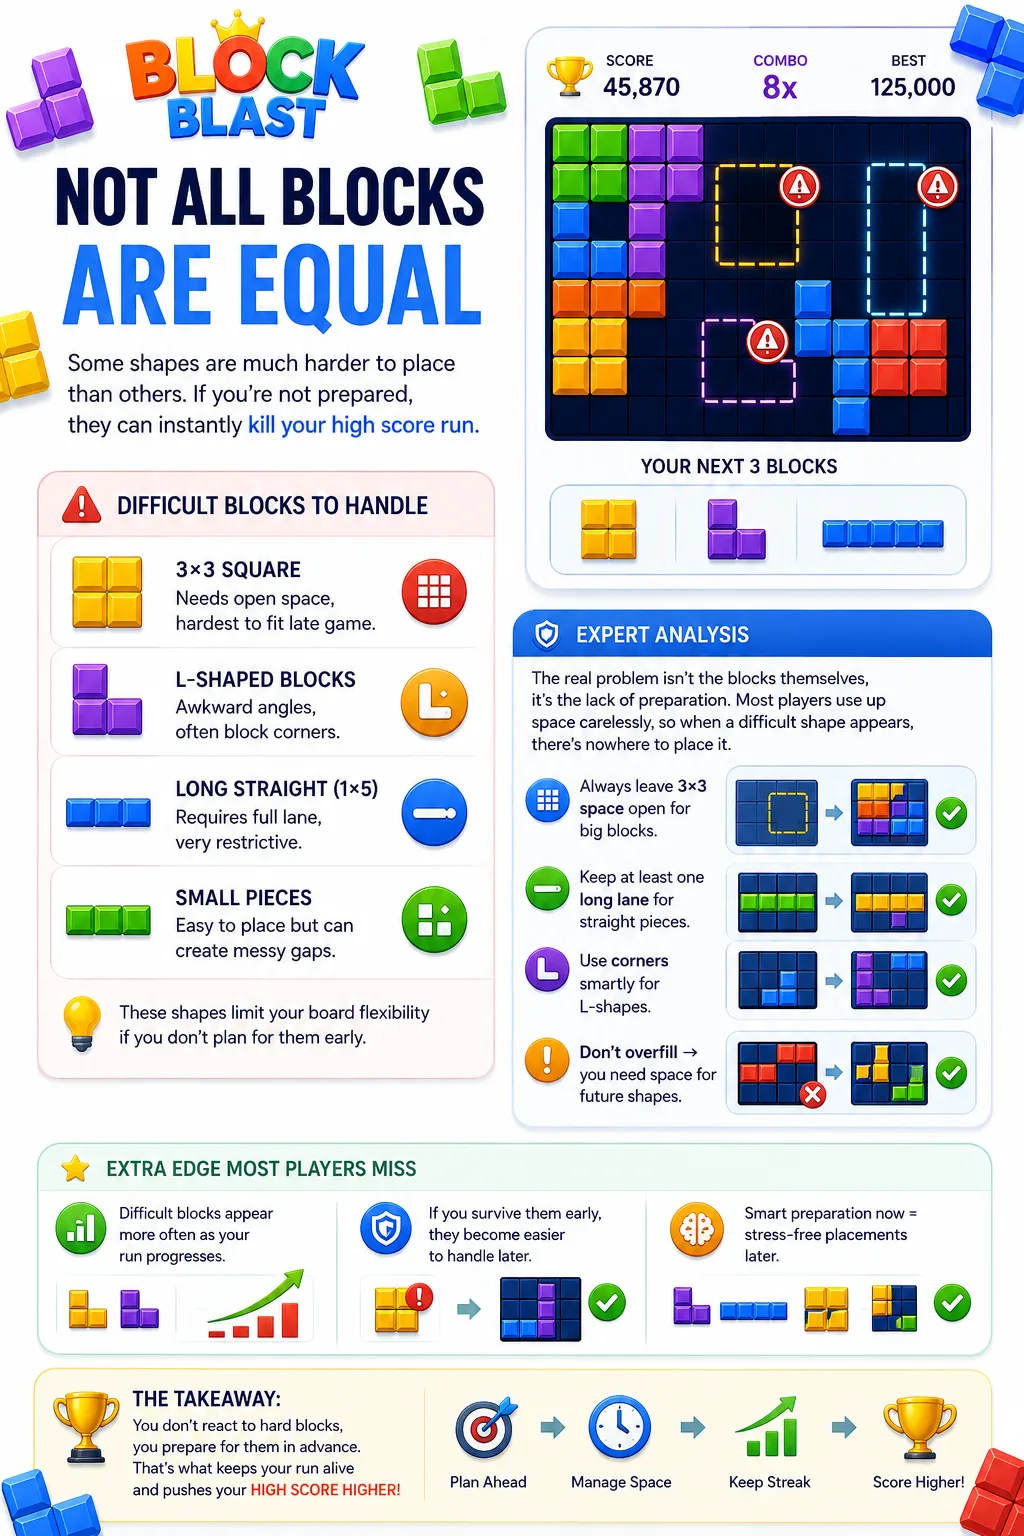
6. Block Types & Difficulty
Not all blocks are equal. Some shapes are far harder to place, and if you're unprepared they can end a run instantly.
- 3×3 square → needs open space, hardest to fit late game.
- L-shaped blocks → awkward angles, often block corners.
- Long straight (1×5) → requires a full lane, very restrictive.
- Small pieces → easy to place but can create messy gaps.
Expert Analysis
The real problem isn't the shapes — it's the lack of preparation. Always leave a 3×3 space open for big blocks, keep at least one long lane free for straight pieces, and use corners smartly for L-shapes. You don't react to hard blocks; you prepare for them in advance.
Check also: Puzzle Games
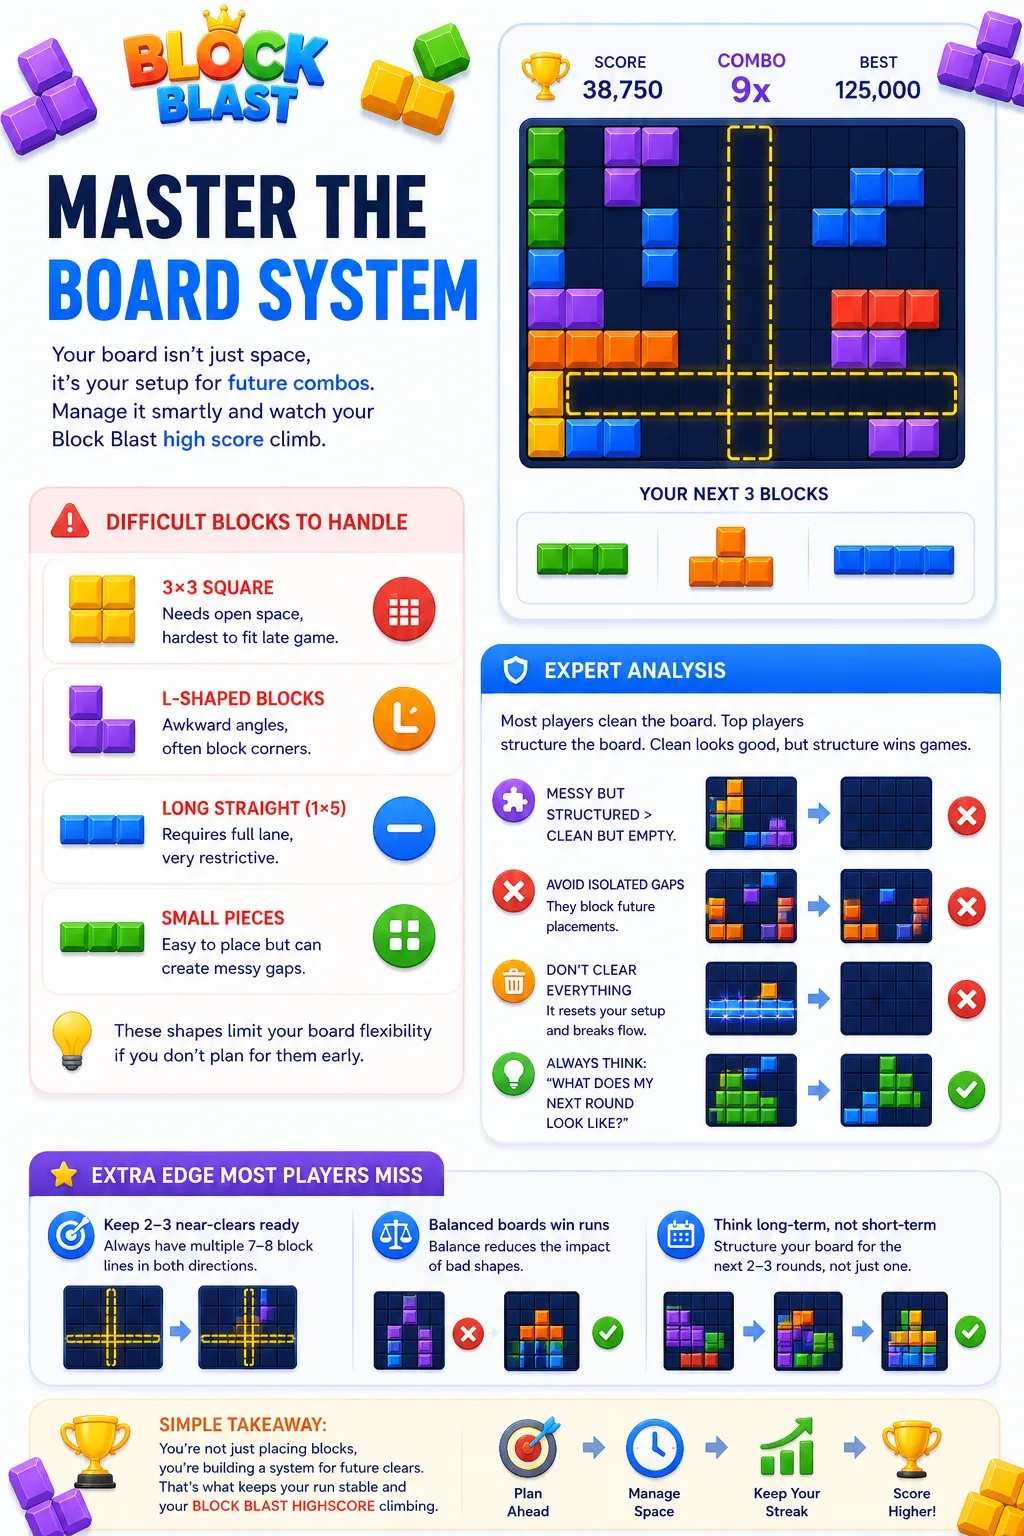
7. Board Management System
Your board isn't just space — it's your setup for future combos. Managing it properly is the key to a stable, high-scoring run.
- Ideal board = partially filled (~20–30%).
- Too full → no placement space, game-over risk.
- Too empty → no combo setups, low scoring.
- Keep multiple near-complete lines (7–8 blocks filled).
Expert Analysis
Average players focus on cleaning the board instead of structuring it. A messy-but-structured board beats a clean-but-empty one. Avoid isolated gaps, don't clear everything (it resets your setup), and always ask: what does my next round look like? Keeping 2–3 near-clears ready makes combo continuation almost automatic.
Read also: Block Blast Solver
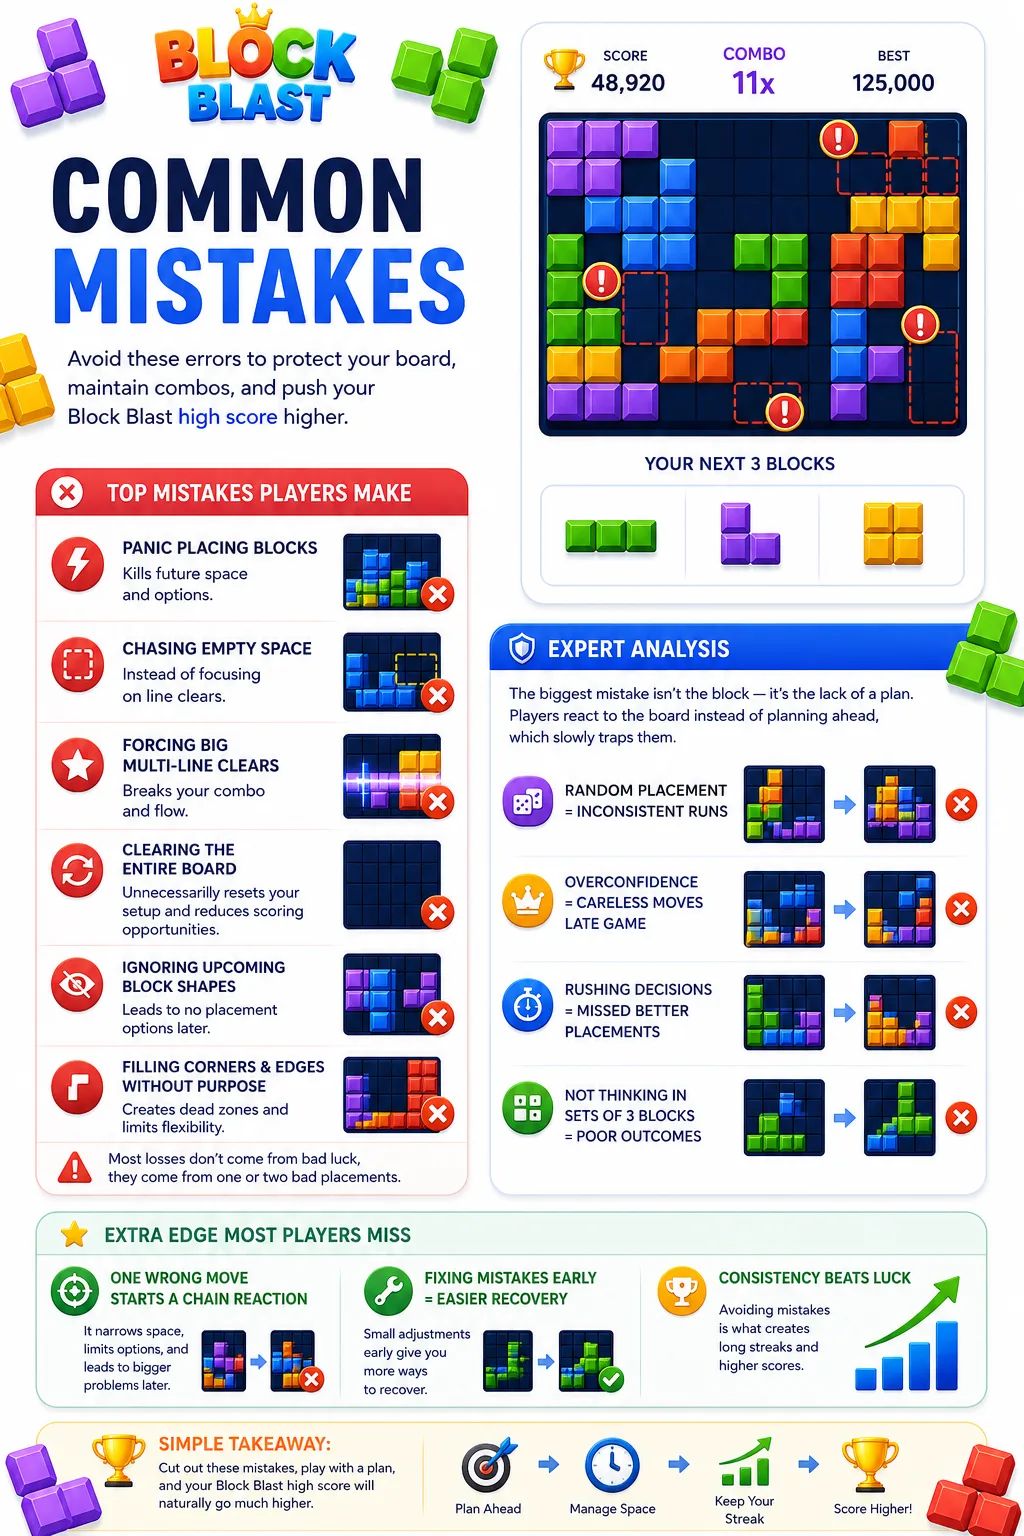
8. Common Mistakes
Small errors can instantly ruin a run, and most players don't even realize they're making them.
- Panic placing blocks → kills future space.
- Chasing empty space instead of clears.
- Forcing big multi-line clears and breaking the combo.
- Filling corners and edges without purpose.
Expert Analysis
Most losses don't come from bad luck — they come from one or two bad placements. The biggest error is playing without a plan: reacting to the current move instead of thinking ahead. One wrong move doesn't end the game, but it starts a chain of problems. Cut these mistakes out and your consistency improves dramatically.
Check also: Play Block Blast Online
9. Survival Mechanics
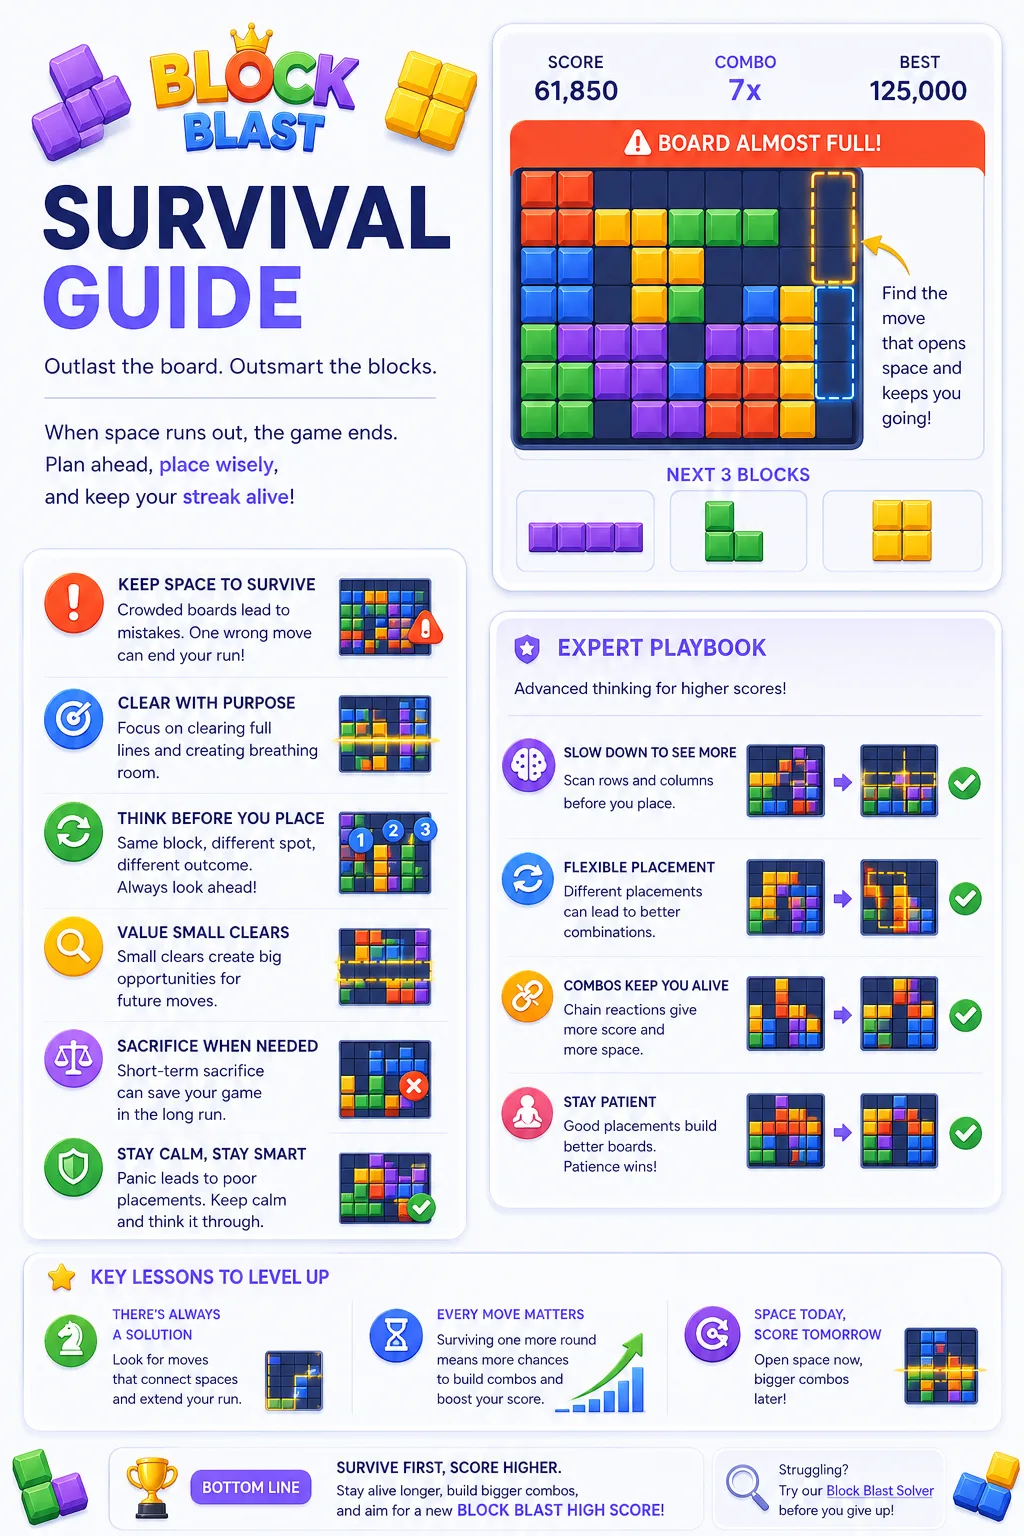
When the board starts filling up, every move matters, and survival becomes the priority.
- Board nearly full → no room for mistakes.
- Focus on clearing space, not perfect setups.
- Use placement order carefully — same blocks, different outcomes.
- Sometimes sacrifice an ideal move to stay alive.
Expert Analysis
Most "impossible" boards actually have a solution — players just rush or overlook the right sequence. Slow down and analyze row by row. Breaking a combo is acceptable if it prevents a game over. Survive first, score second: staying alive gives you more rounds to rebuild.
Stuck? Try the Block Blast Solver
10. Game Behavior & Patterns
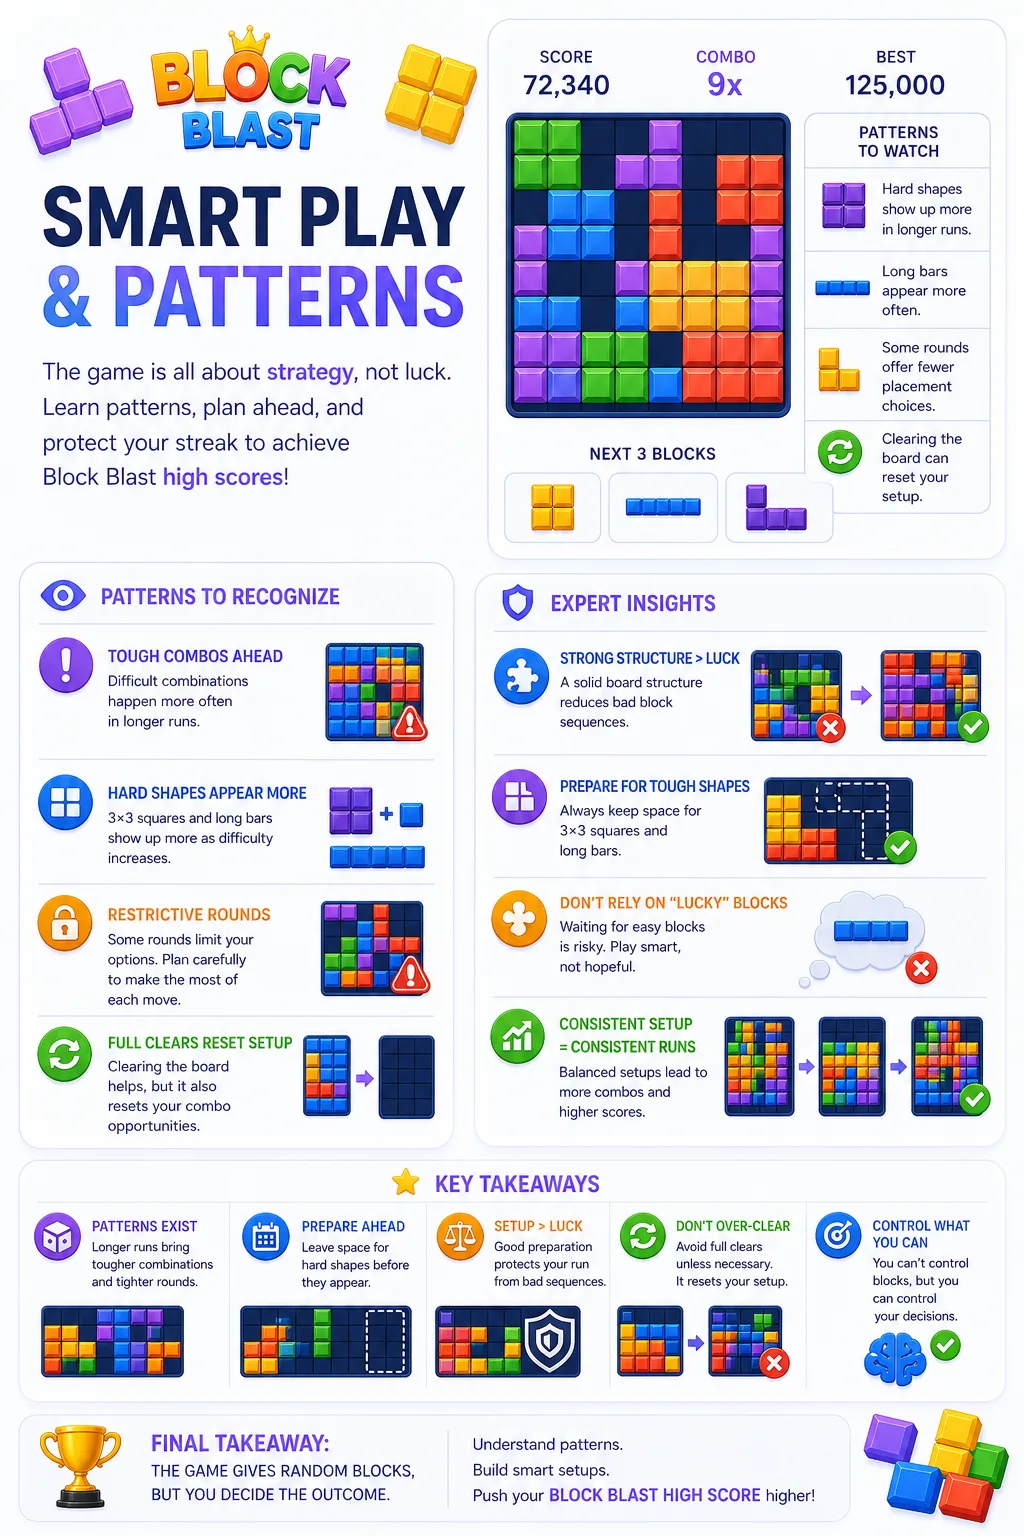
Block Blast may feel random, but over time clear patterns emerge in how the game behaves.
- Difficulty ramps up as your run progresses.
- Hard shapes like 3×3 squares and long bars appear more often later.
- Some rounds feel very restrictive with limited options.
- Fully clearing the board can reset your setup and reduce combo chances.
Expert Analysis
Players blame bad luck, but most losses come from poor preparation before difficult patterns appear. Good board structure minimizes the impact of tough blocks. Expect difficult shapes and always leave space for them — don't rely on "lucky" blocks to save your run.
Check also: Block Blast Unblocked
How to Get a High Score Every Time?
Now that you understand how the game works, here are the exact moves that level up your play. High-score players control combos, manage space, and think a few moves ahead every round.
1. Play for Line Clears
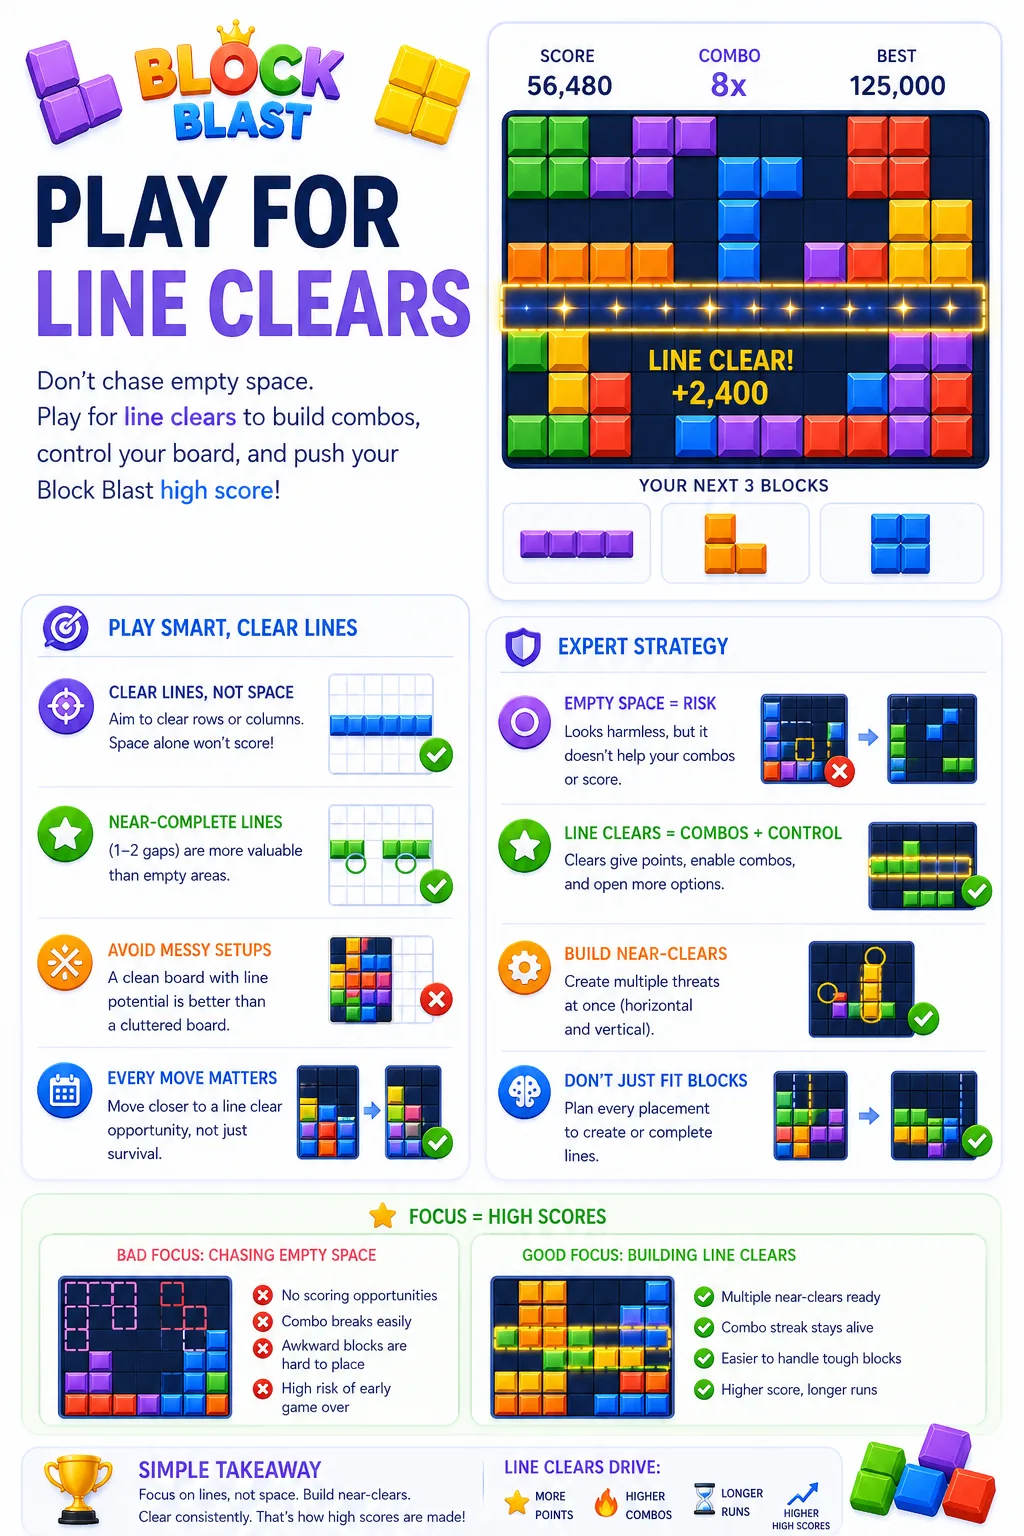
Most players chase empty space thinking it keeps the board safe, but that kills your scoring potential. Always play for line clears, not open space.
- Always aim to clear rows and columns, not just create space.
- Near-complete lines (1–2 gaps) are more valuable than empty areas.
- A slightly messy board that clears lines beats a clean board that doesn't score.
Expert Analysis
Empty space is temporary safety with no scoring engine. Line clears are combo fuel plus board control. Setting up near-clears ensures you always have a next move ready. Stop playing to "fit blocks" — start playing to trigger clears every round.
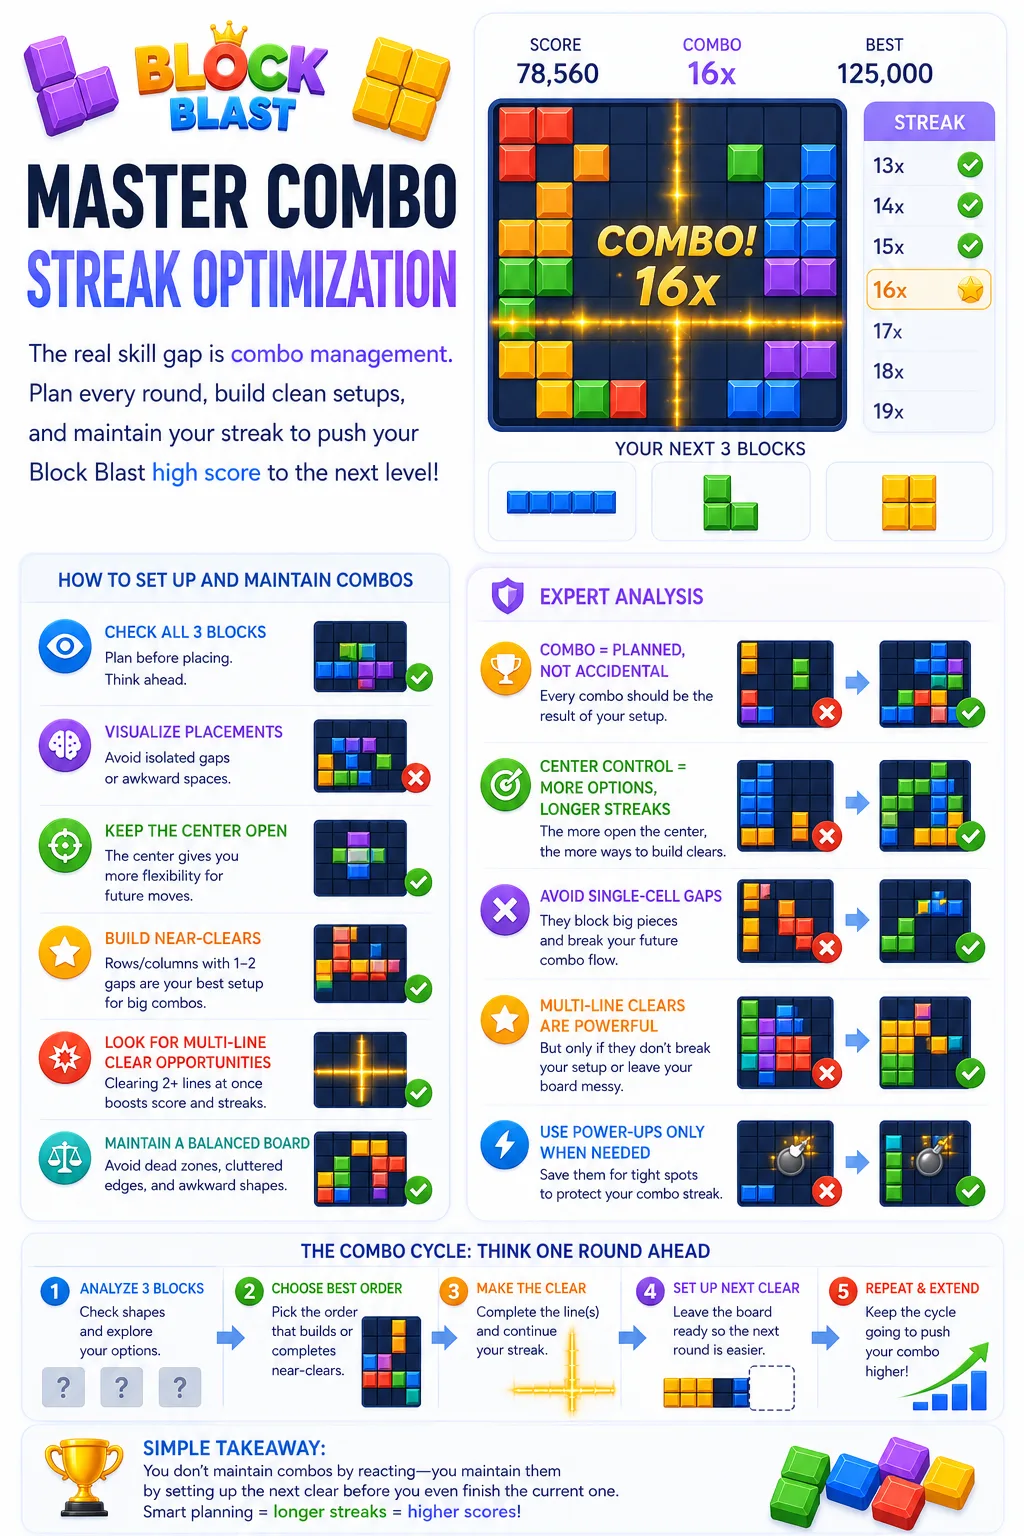
2. Master Combination Streak Optimization
How well you manage your combo streak is the real skill gap. Combos don't just happen — you set them up every round with planning and clean board structure.
- Always check all 3 blocks → plan before placing anything.
- Keep the center open → maximum flexibility for future clears.
- Build near-clears → an easy way to guarantee the next combo.
- Look for multi-line clears when they're safe.
Expert Analysis
Combos are planned, not accidental. Center control gives more options and longer streaks. Avoid single-cell gaps — they block future combos. You maintain combos by setting up the next clear before finishing the current one.
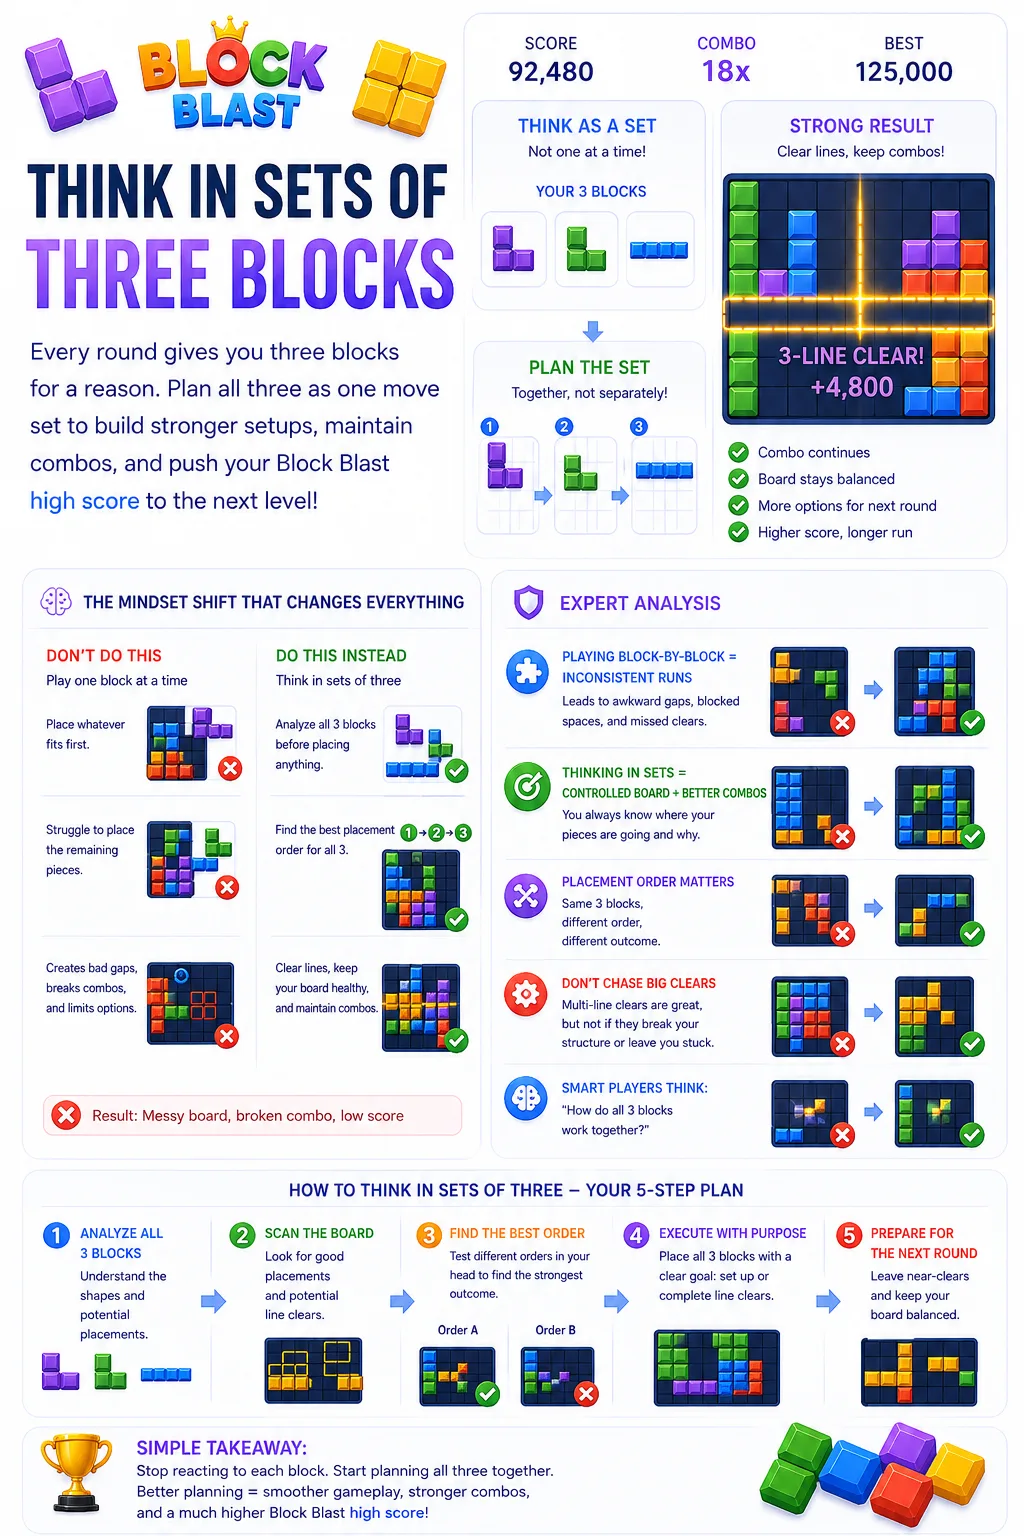
3. Think in Sets of Three Blocks
Every round gives you three blocks for a reason. Treat all three as a single move set instead of handling each piece separately.
- Always check all 3 blocks → plan before placing anything.
- Visualize placements → avoid isolated gaps.
- Placement order matters → same pieces, different outcomes.
- Think: "how do all 3 blocks work together?"
Expert Analysis
Playing block-by-block leads to inconsistent runs. Thinking in sets gives a controlled board and better combos. Smart players use the first blocks to set up clears, and aim for the last block to secure a line clear or combo continuation.
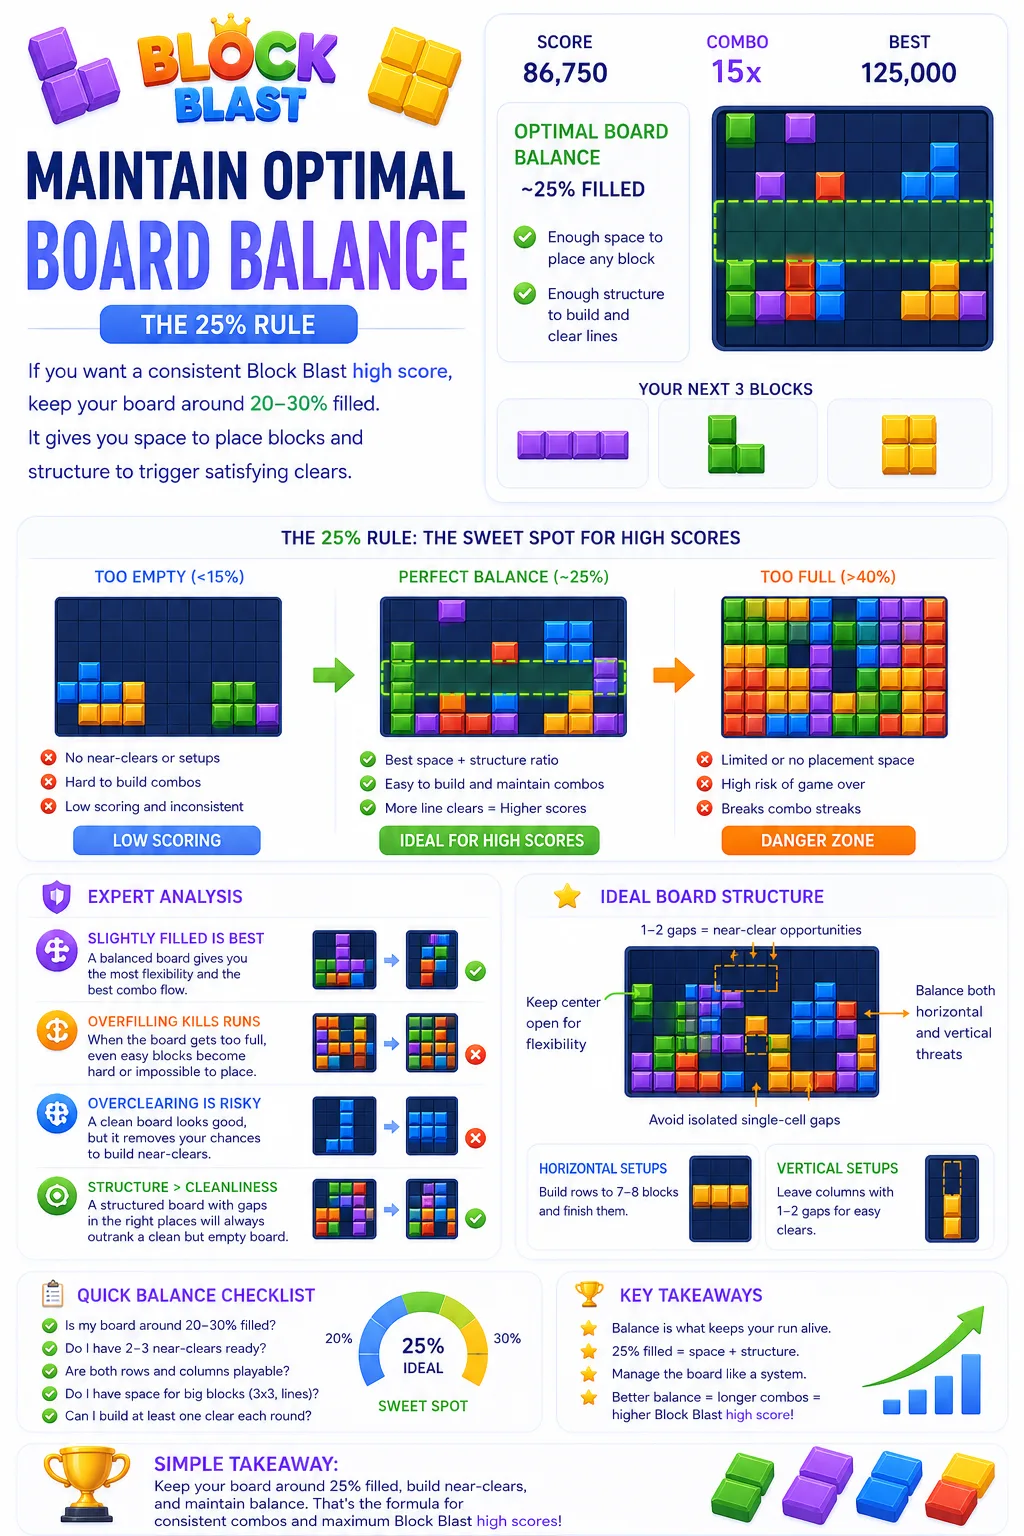
4. Maintain Board Balance (The 25% Rule)
Your board should never be too full or too empty. The sweet spot is around 20–30% filled, where you have space to place blocks and enough structure to trigger clears.
- Keep the board partially filled (~25%).
- Too full → no placement space, game-over risk.
- Too empty → no combo setups, low scoring.
- Balance horizontal and vertical opportunities.
Expert Analysis
Players either overfill or try to keep the board completely clean — both hurt scoring. Overcrowding limits options, while over-clearing kills next round's setup. You're not just clearing space, you're managing a system. A structured board beats a clean board.
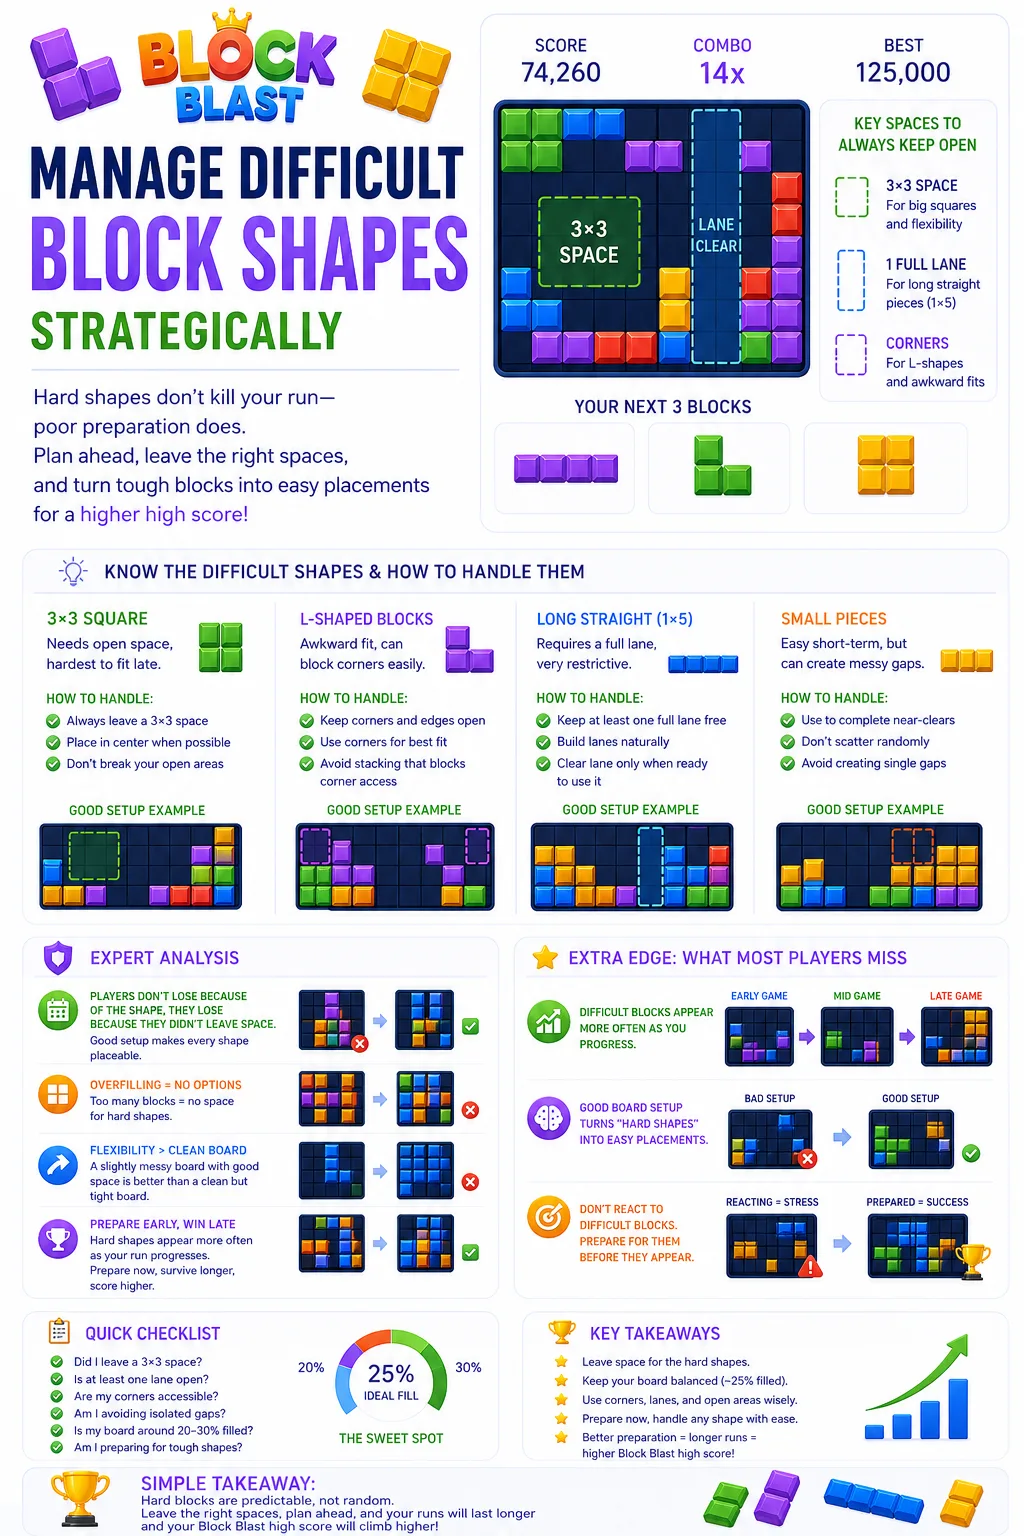
5. Manage Difficult Block Shapes Strategically
Certain shapes are harder to deal with, and if you don't plan for them early, they'll eventually kill your run.
- 3×3 square → needs open space, hardest to place late.
- L-shaped blocks → awkward fit, can block corners easily.
- Long straight (1×5) → requires a full lane, very restrictive.
Expert Analysis
Players don't lose because of the shape — they lose because they didn't leave space for it. Always keep a 3×3 area open, keep one long lane free, and use corners for L-shapes. Good setup turns "hard shapes" into easy placements.
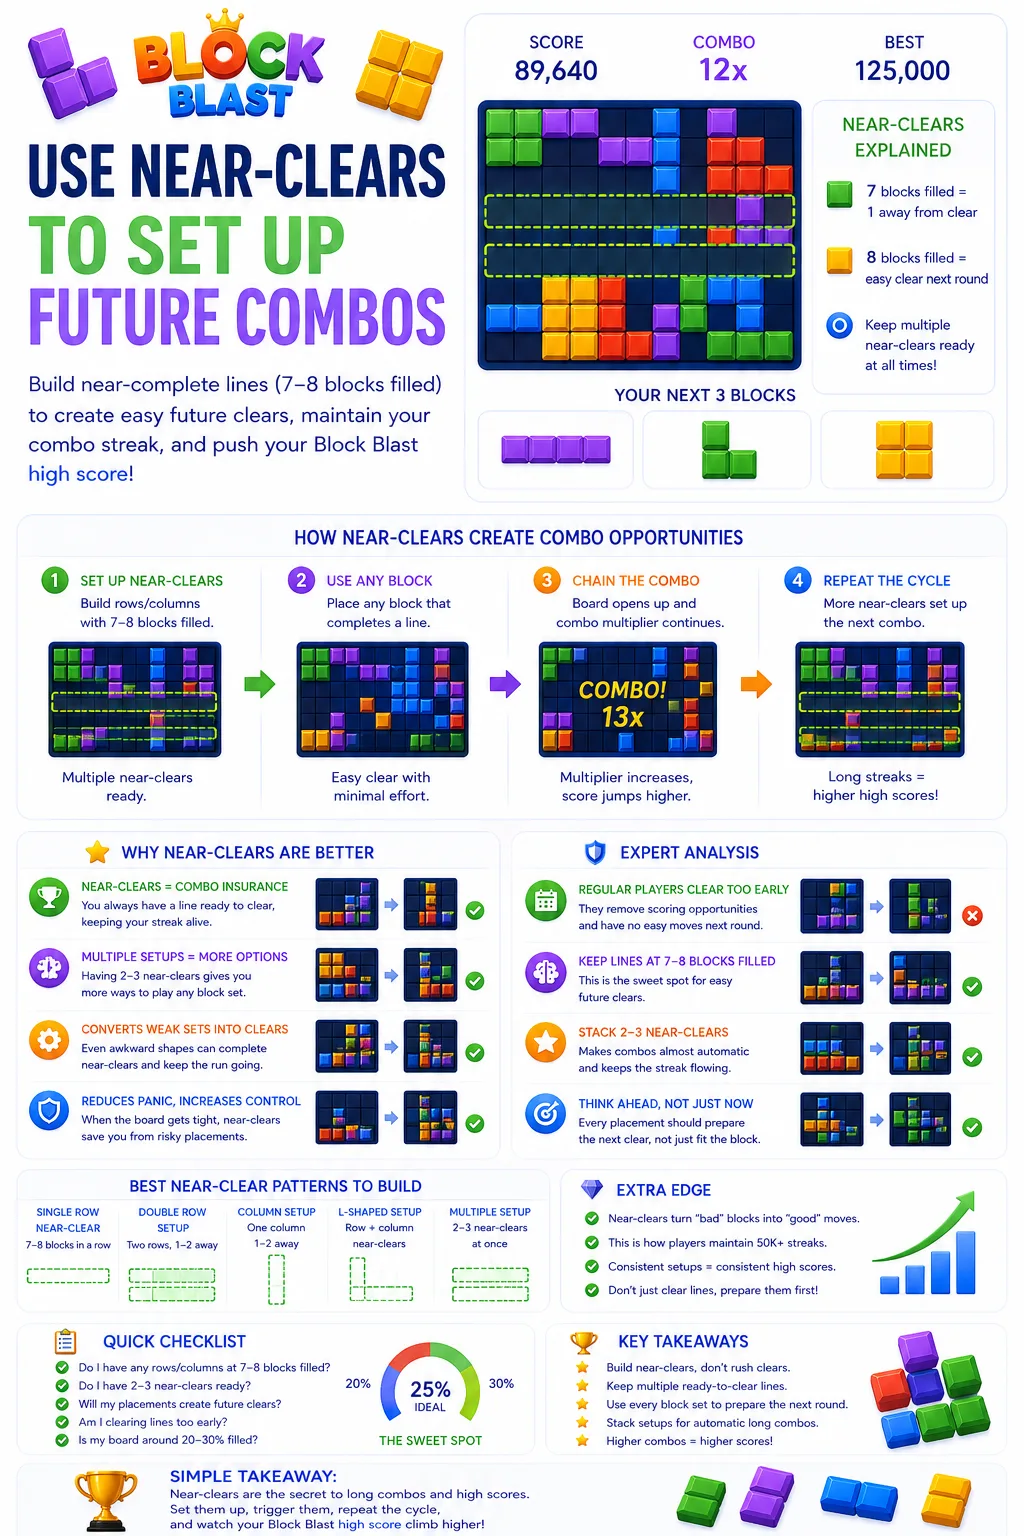
6. Use Near-Clears to Set Up Future Combos
Instead of clearing lines randomly, build near-clears — rows or columns just 1–2 blocks from completion. This is one of the most reliable ways to keep your streak alive.
- Keep lines at 7–8 blocks filled.
- Set up multiple near-clears at once.
- Always aim to have a ready-to-clear line for next round.
- Use placements that prepare future clears, not just current ones.
Expert Analysis
Near-clears are combo insurance. Stacking 2–3 of them makes combos almost automatic, and this is how long streaks (50K+) are maintained. Don't clear lines too early — prepare them first, then convert bad block sets into usable placements.
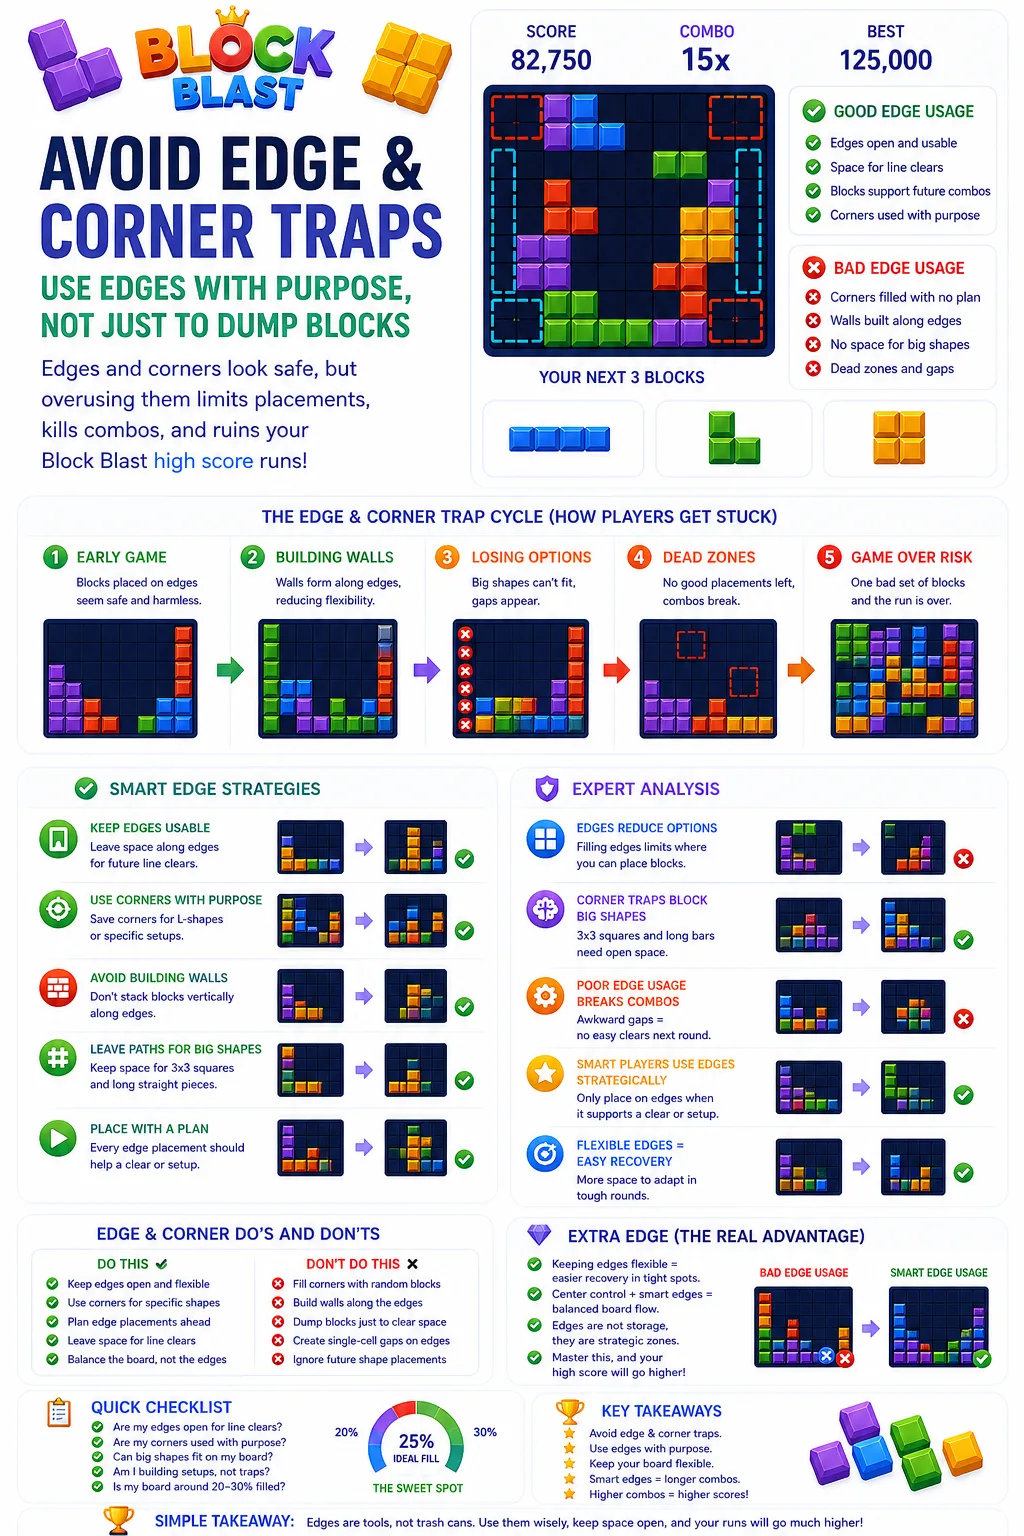
7. Avoid Edge & Corner Traps
Edges and corners look safe, but overusing them limits future placements and makes it harder to keep combos going.
- Avoid filling corners without a clear payoff.
- Don't build walls along edges — it kills flexibility.
- Keep edges usable for future line clears.
- Use corners mainly for L-shapes or planned setups.
Expert Analysis
Players slowly trap themselves by stacking blocks along the sides. It feels safe early but creates dead zones later. Corner traps block large shapes like 3×3. Edges are strategic zones, not storage — keeping them flexible gives easier recovery in tough rounds.
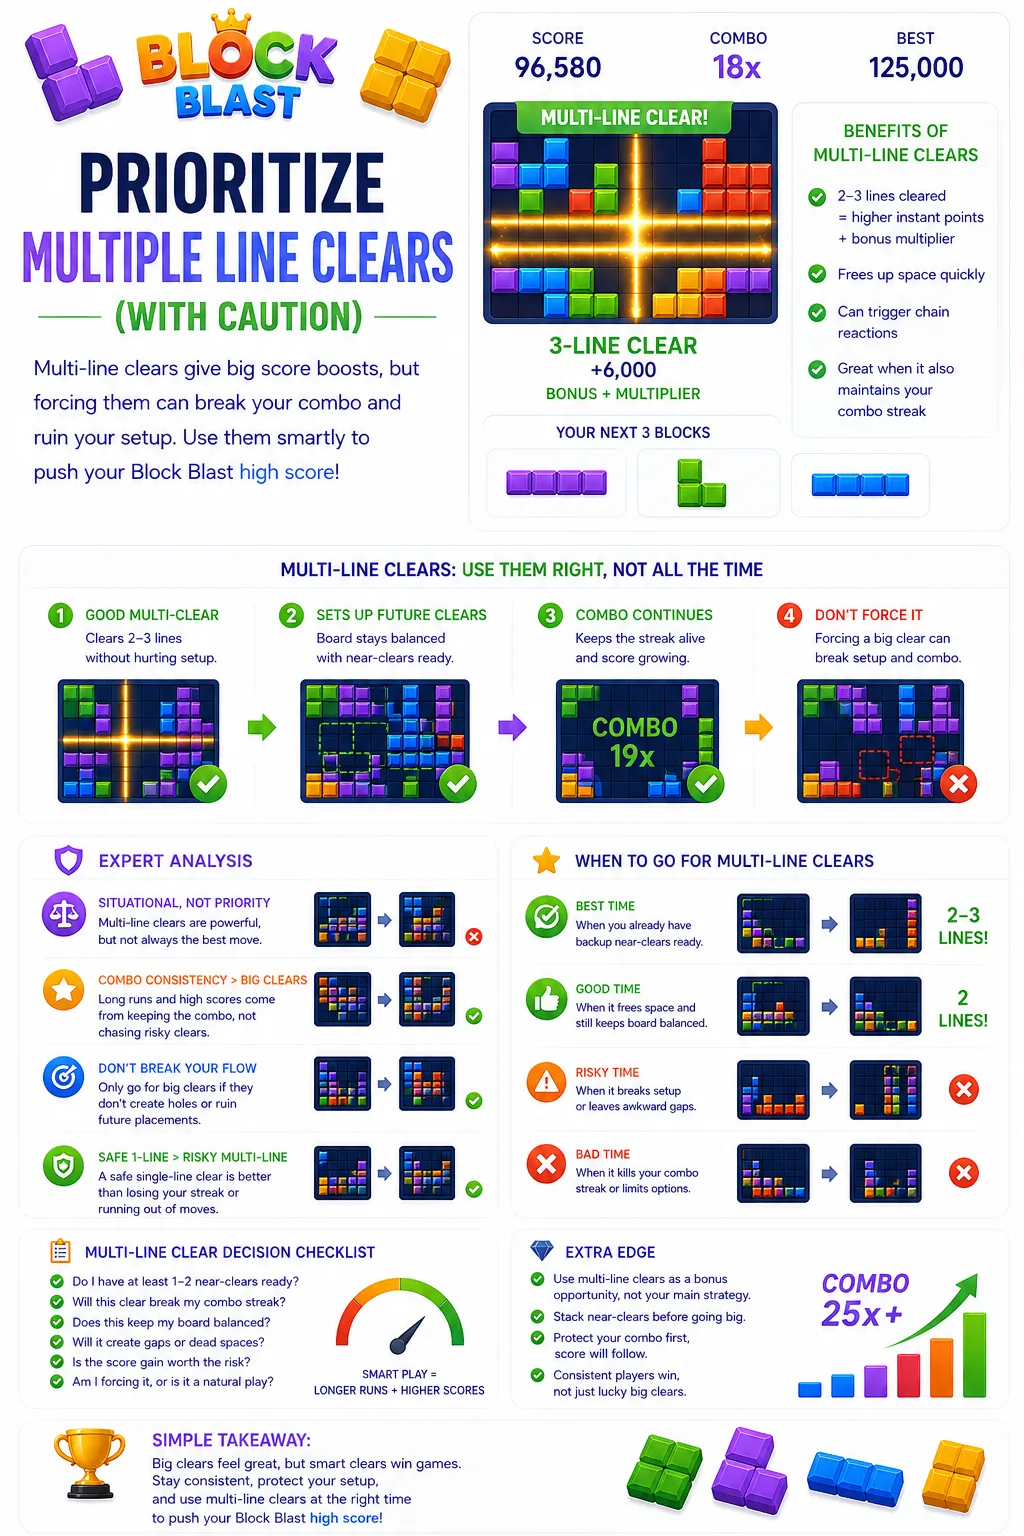
8. Prioritize Multiple Line Clears (With Caution)
Multi-line clears give a big score boost, but only when used at the right time.
- Clearing 2–3 lines → higher instant points plus a bonus multiplier.
- Helps free up space quickly.
- Great when it also maintains your combo streak.
Expert Analysis
Forcing multi-line clears is one of the fastest ways to ruin a run — players chase big clears and break their combo. A safe 1-line clear is better than losing your streak. Use multi-clears as a bonus opportunity when you already have backup near-clears ready, never as your main strategy.
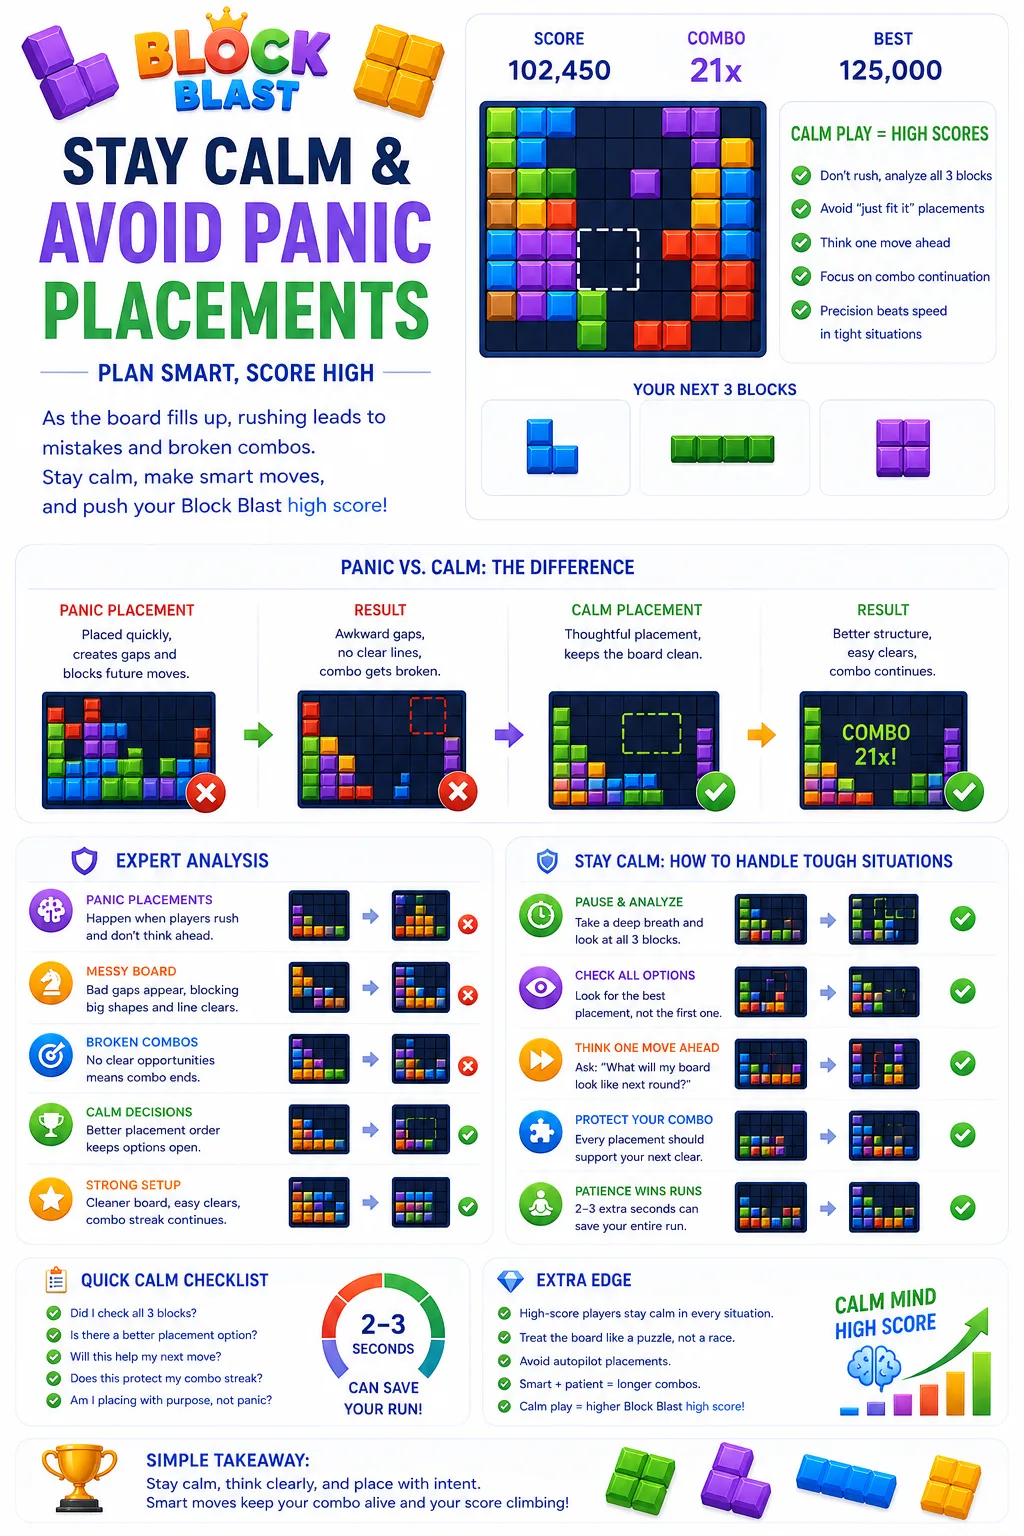
9. Stay Calm & Avoid Panic Placements
As the board fills up, most players rush and place blocks just to survive. That's exactly when mistakes happen.
- Don't rush → take a second to analyze all 3 blocks.
- Avoid "just fit it" placements → they create bad gaps.
- Always think one move ahead before placing.
- Tight situations need precision, not speed.
Expert Analysis
Panic is what kills most high-score runs. Calm decisions lead to better placement order and cleaner setups. High-score players treat tough boards like a puzzle, not a rush. Taking 2–3 extra seconds can save your entire run.
Does Block Blast Have Hidden Game Mechanics?
Block Blast looks simple on the surface but hides several mechanics that affect your run.
- Block generation feels random, but difficulty ramps up as your run progresses.
- Hard shapes (3×3, long bars) appear more often in later stages.
- Some rounds feel more restrictive with limited placement options.
- Combo rules vary slightly depending on version and timing system.
- Fully clearing the board can reset your setup and reduce combo chances.
In short, the game isn't purely luck-based — your setup and decisions determine how these mechanics impact your run.
Tips and Tricks to Improve at Block Blast
- Play in short, focused sessions instead of long random grinding.
- Always pause and analyze all 3 blocks before placing.
- Replay your mistakes mentally — understand what went wrong.
- Focus on combo consistency over risky plays.
Top 3 Puzzle Games to Make You Better at Block Blast
These games train the same mechanics — space management, combo flow, and pattern recognition.
- Woodoku → improves board balance and structured placement.
- 1010! → trains line-clear focus and grid awareness.
- Tetris → builds fast thinking and placement efficiency.
Key Takeaways
- Scoring is driven by clearing full rows and columns, with extra value from combo streaks and multi-line clears.
- Combos are the real scoring engine — clear at least one line consistently to keep your streak alive.
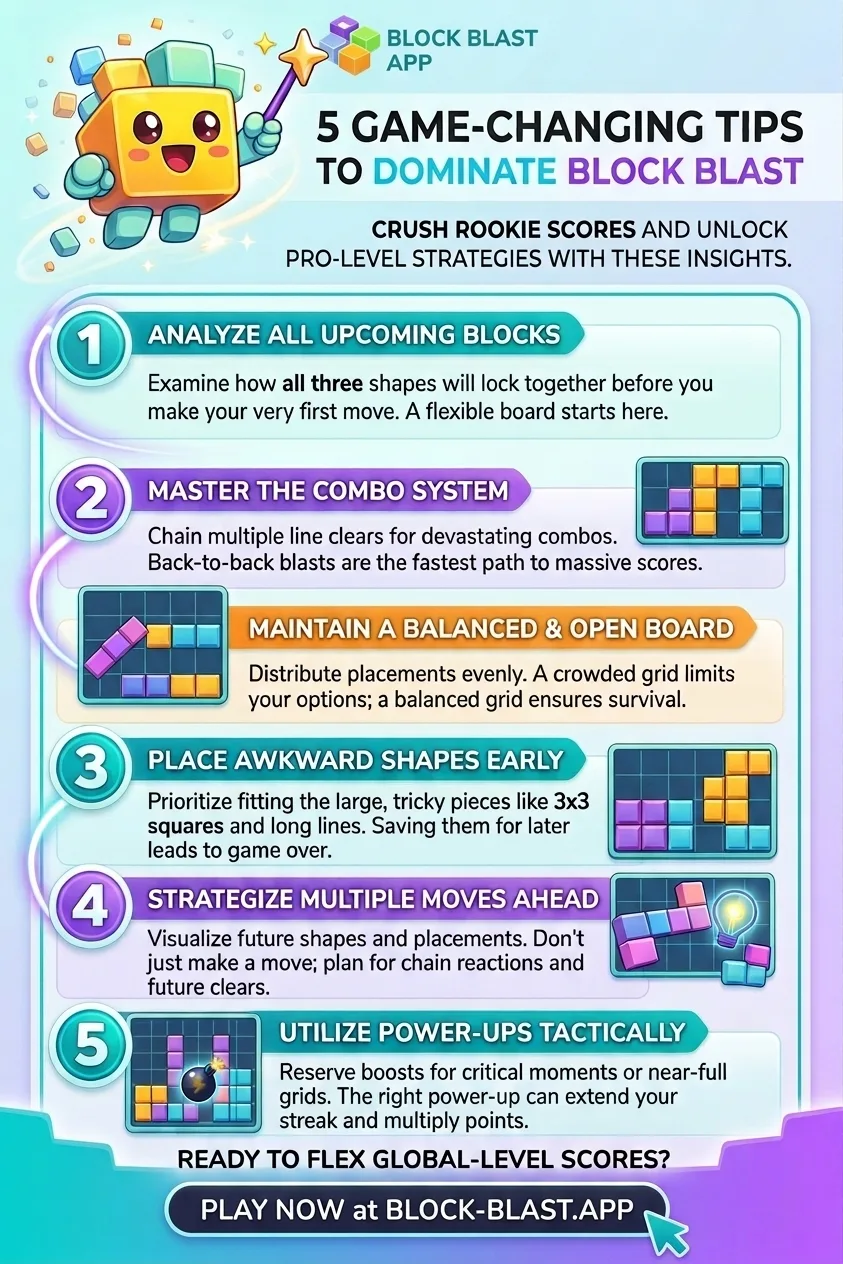
- Always plan all 3 blocks ahead and avoid random placements that trap your board.
- Keep the center open and maintain a balanced board (~25% filled) for maximum flexibility.
- Focus on near-clears (1–2 gaps) instead of chasing empty space.
- Avoid isolated gaps and edge traps — they limit future moves and break combos.
- Difficult shapes (3×3, long bars, L-blocks) require pre-planned space, not last-second adjustments.
- Use power-ups strategically to save runs and keep momentum, not for early scoring.
- Stay calm in tight situations — most boards have a solution if you analyze properly.
Frequently Asked Questions
How to get a higher score in Block Blast?
Focus on maintaining combos and smart placements — consistent streaks are the key to a higher score.
Is there a Block Blast high score hack?
There's no true "hack," but you can improve your score by prioritizing line clears, mastering pattern recognition, and keeping your combo streak alive. Our Block Blast Solver also recommends the optimal move on any board.
How to win Block Blast?
You win by lasting longer and stacking combos, which naturally leads to a higher score.
How to get better at Block Blast?
Practice pattern recognition, plan all 3 blocks ahead, and focus on consistency to improve your high score.
What are the best tips for Block Blast?
Play for line clears, avoid isolated gaps, and protect your combo streak to push a strong score.
What is the best Block Blast technique?
The best technique is combo-based play with near-clears and controlled board management for a consistent score.
Conclusion
Block Blast isn't just a casual puzzle — it's a real brain battle where one wrong placement can ruin your combo. With these strategies, you can play smarter, control your board, and keep your combos flowing. No more random placements, no more frustrating losses — just cleaner gameplay and consistent runs.
Ready to put these tips into practice? Play Block Blast App now! · How to Play · Block Blast Solver · Play Online · Score Generator